


THE RULES
Welcome to the Digital Rulebook for GRIM the Card Game. Before we discuss gameplay, it's best to familiarize yourself with the various cards in GRIM the Card Game. Head over to THE CARDS to review the 11 GRIM DECKS and the AFTERWORLDS. You will be choosing 2 Grim Decks to pair together as you play, so knowing their unique strategies and gimmicks is essential to developing your play style.
GRIM is a two-player strategy game that requires each player to choose 2 of the 11 provided GRIM DECKS, each which consists of 10 Elemental GRIM CARDS, the creatures with which you battle throughout the match. Players will command those Grim to launch ATTACKS in hopes of defeating their Opponent's Grim. With enough Knockouts, one player will win the game. But be warned, this game is heavily balanced by THE FIEND, who attempts to prolong your battle. At the bottom of this page is a 15-minute How to Play video. Also at the bottom of this page is a Key Words Section that provides detailed definitions of each term in case you ever get lost, an FAQ for common questions, and an alternate ruleset for our COVEN format.
GRIM is a complex game ripe with strategy. It may take one or two plays to fully grasp every aspect of the following rules. Please review the FAQs for specific cards on each Element webpage if any questions arise, and join our Discord server to ask questions directly to the creator.
The RULEBOOK provided in the physical copy of GRIM the Card Game will be a helpful tool for getting started, but for nuanced questions and strategy, this webpage will provide more context and answers to FAQs. For a downloadable PDF of this webpage, click below for the official GRIM Guide Book.
THE CARDS
There are four types of cards in GRIM the Card Game: (1) GRIM CARDS, which are the creatures that you battle with; (2) ELEMENTS, which can be attached to Grim to supplement their offensive and defensive capabilities; (3) SPIRITS, which can be attached to Grim for a stockpiling mechanic described further below; and (4) AFTERWORLDS, which are terrain effect cards that rotate each Round.
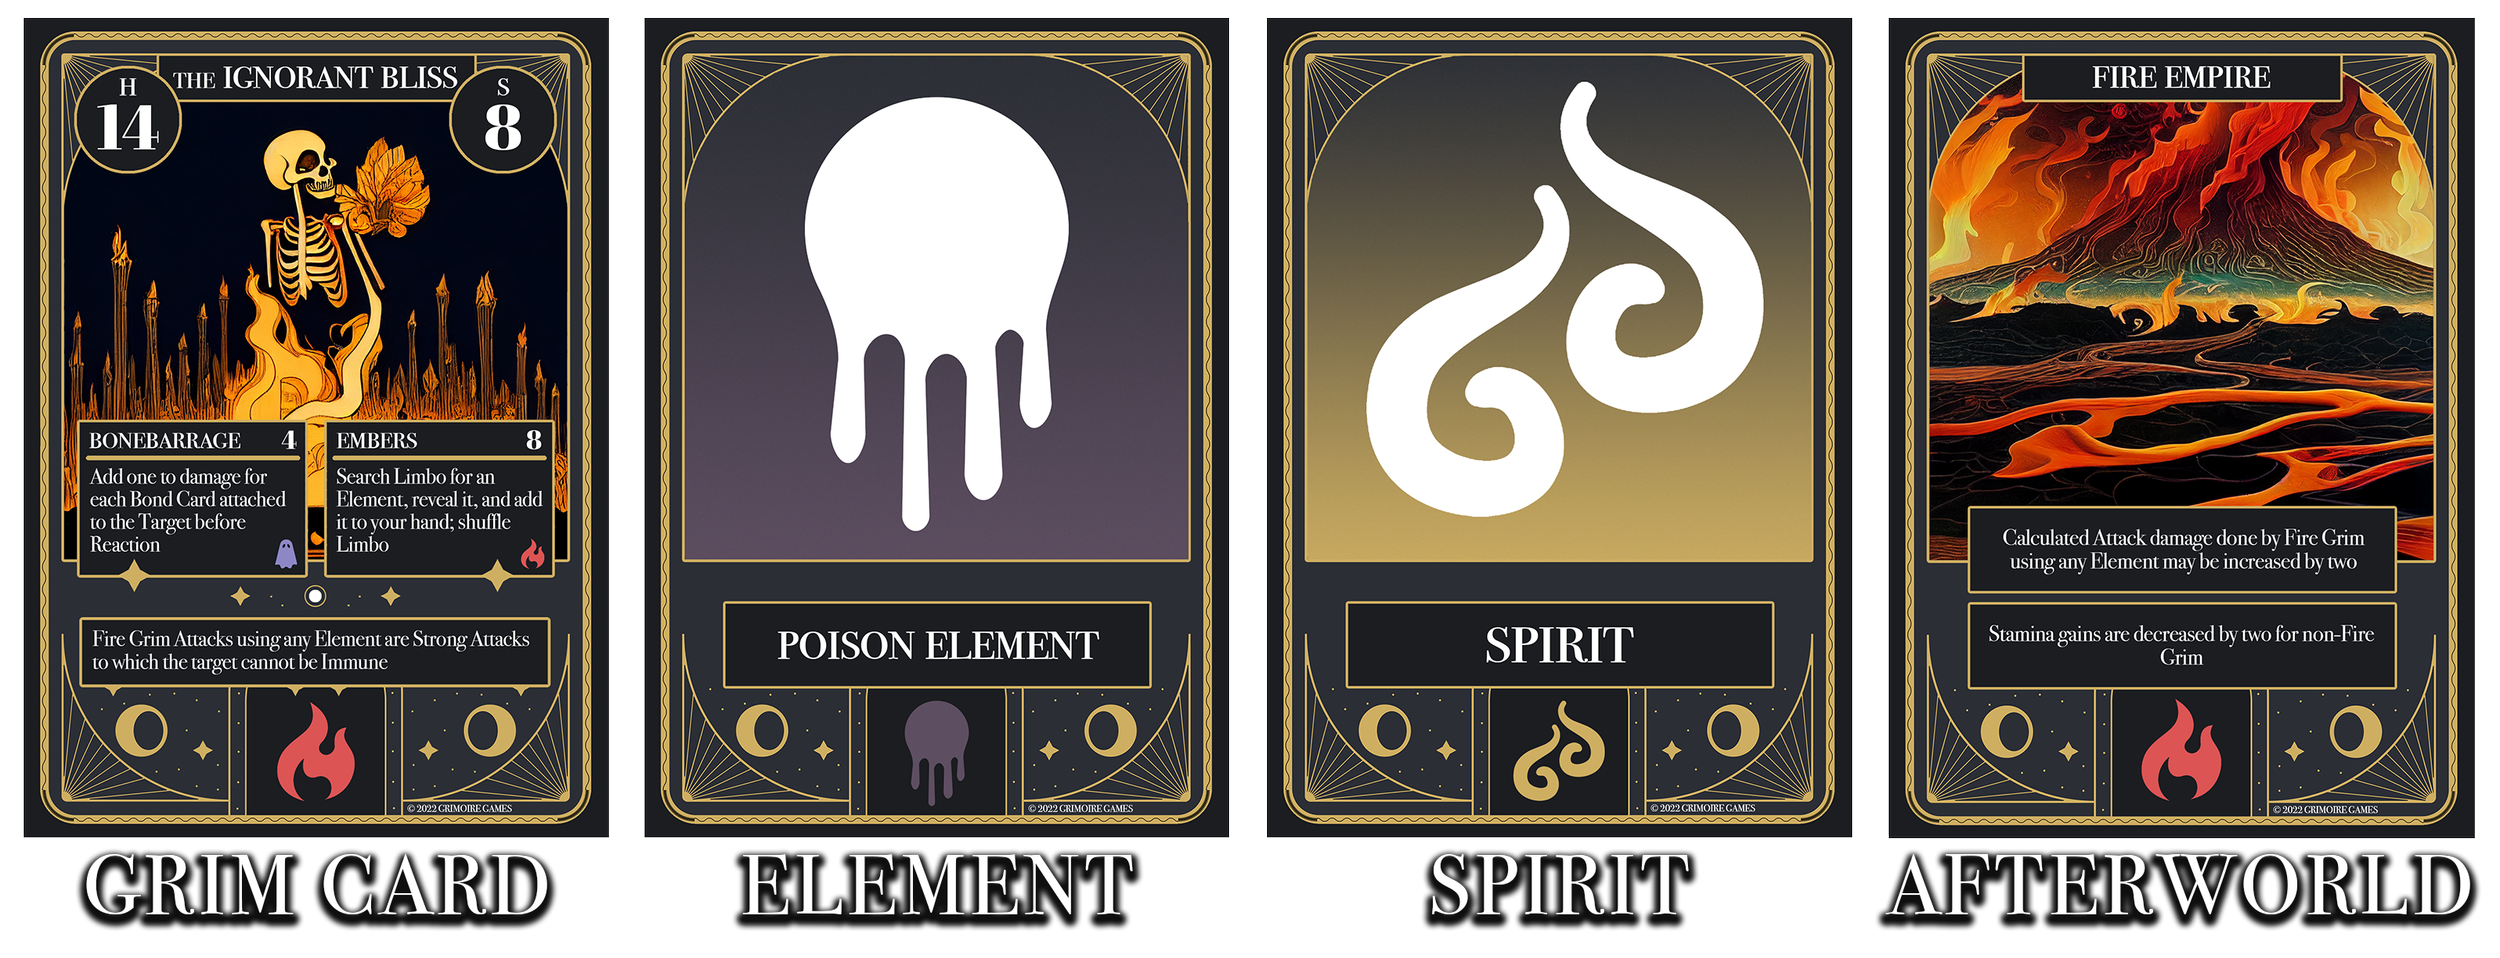
GRIM CARDS. Grim Cards each have a Health, a Speed, two Attacks, a Passive, and a primary Element. Each Attack has a Synergy Effect that can trigger only when the Grim is played next to an Ally Grim with the required Element shown on the bottom right of the text. For example, for the Grim below, its SPOOK Synergy Effect would only trigger if it was played next to a Ghost Grim (which can be a Grim with the Ghost icon directly on the card or any Grim with the Ghost Element attached). Here, we would say that THE MUMMER MIST has SPOOK Synergy, but it does not have SHEETSHINE Synergy (as it is not next to a Light Grim).


THE SETUP
Separate the Grim Decks by Element (each with ten Grim and a Grimlord Card). Players must mutually decide (or flip a coin to decide) who will choose and ban the first Grim Decks, and who will instead have FIEND’S FAVOR in the first Round. Fiend’s Favor grants the following: (1) +0.5 Speed to your Grim for the Round; (2) the ability to choose the active Afterworld for the Round; (3) the ability to search your Grim Decks for one card and add it to your hand be- fore the Round begins. NOTE THAT BEFORE ROUND ONE, HOWEVER, BOTH PLAYERS WILL PERFORM THIS SEARCH REGARDLESS OF WHO HAS FIEND’S FAVOR.
The player without Fiend’s Favor will choose a Grim Deck (set to your left), then ban a Grim Deck (flip and shuffle it, and the other player will take two random cards from it that remain a secret to both players). Repeat this process in the other direction, then for each player once more, so that both players have two Grim Decks (A below) and four secret cards. These secret cards are called the Banished (B). Shuffle them and place them to your right. These will be drawn when you suffer a Knockout. This process is called the Pick-Ban Phase.
Next, shuffle together all Elements and Spirits (the Bond Deck) and place them to the side between the players (C), and the Afterworlds face-up on the other side (D). Throughout the match, discarded Afterworlds will be placed next to this deck--all other cards will be discarded to Limbo (E). Limbo will remain face-down and is not public information. The Afterworlds can be freely searched.
Place the Tracker (F) in front of each player. This will be used to track each Grim’s Health, Stamina, and Status, and the player’s Fiend’s Favor and Reaction. Below you can also see where your Grim will be played (G) and how the Spirits and Elements can be slid beneath them when attaching. Before moving to the next section, each player should take ten cubes. The player with Fiend’s Favor should place a cube on the “F” on their Tracker, and both players should mark the “R” to show that they have a Reaction available for the first Round.
ELEMENTS. Each Grim has a primary Element printed on its card, but Elements can also be drawn and attached to Grim to provide them a secondary Element. In the example above, THE MUMMER MIST starts as a Ghost Grim, but becomes a Fire and Ghost Grim by attaching a Fire Element (place the Fire Element beneath it with the bottom protruding). Adding an Element will impact the Grim's offensive and defensive interactions. GRIM CAN ONLY HAVE ONE ELEMENT ATTACHED UNLESS EXPRESS TEXT PROVIDES OTHERWISE, and attaching a new one will force you to discard the old one.
SPIRITS. Spirit Cards can be attached to Grim as a stockpiling mechanic. If you can successfully attach three Spirits to a Grim, you will unlock a Spirit Bonus related to the Grim's Element(s), which is a strong one-time boost. In the case of Grim having an Element attached, it has the option of using either Element's Spirit Bonus, providing you options to adapt.
AFTERWORLDS. Afterworlds are terrain effect cards that affect the entire field of play. There is one Afterworld for each Element in the base game, and each benefits that Element and detriments the Element it is weak to (Element weaknesses and other interactions will be discussed in the next section). For example, THE FIRE EMPIRE benefits Fire Grim and detriments Water Grim.

THE PLACEMENT
Each player draws two Grim Cards from each of their Grim Decks and four Bond Cards from the shared Bond Deck. Next, the player with Fiend’s Favor sets the Afterworld for the first Round into play. Then, each player will search their Grim Decks and add one Grim to their hand, then shuffle their Grim Decks. Remember, starting in Round two, only the player receiving Fiend’s Favor will perform this search. Eventually you will search for unique Passives that you know from memory. In your first play, consider finding a Grim with Attacks that display Elements that you have in your hand.
Next, each player must choose their starting Grim and play them face down. YOU MAY ALWAYS ATTACH A BOND CARD TO A NEWLY PLACED GRIM. Players will then flip them over at the same time to begin the match.
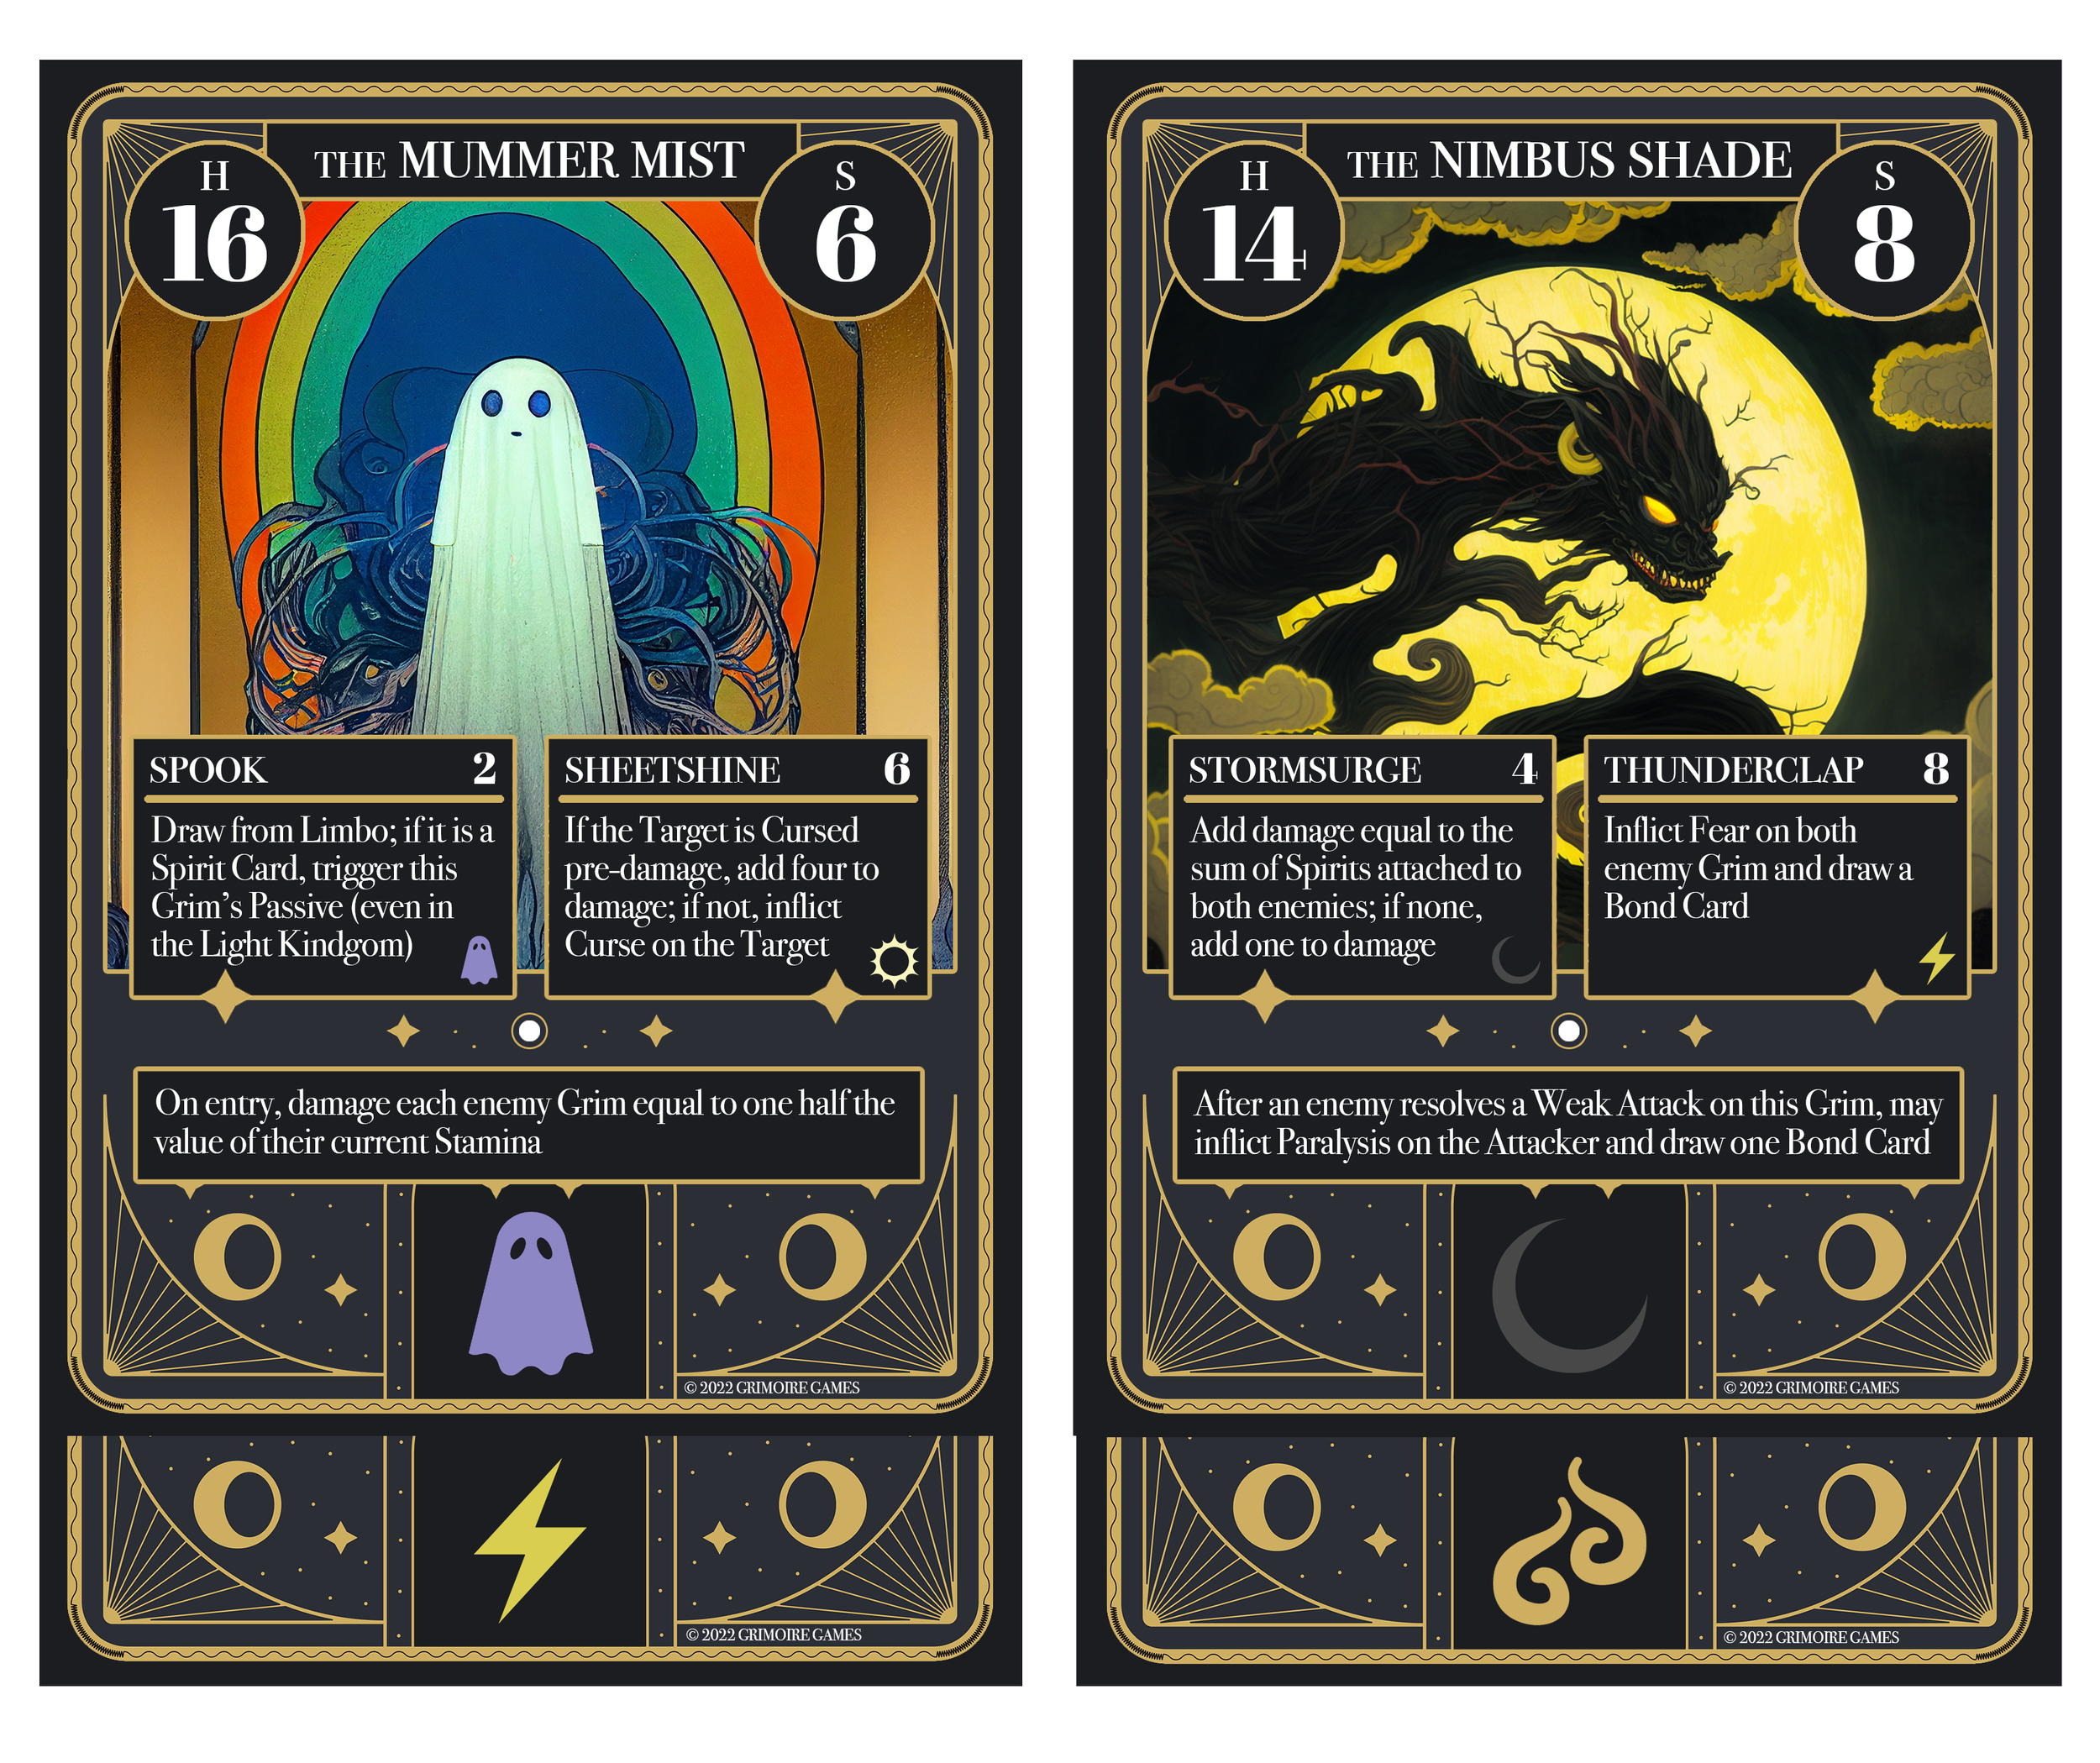
Here, the player chose to attach an Electric Element to THE MUMMER MIST and a Spirit to THE NIMBUS SHADE. Let's review what we know about these cards to analyze why they made this decision.
THE NIMBUS SHADE is a Dark Grim with access to Dark and Electric Synergy. This player has opted to place an Electric Element on THE MUMMER MIST to unlock its THUNDERCLAP Synergy Effect. Now when The Nimbus Shade declares a Thunderclap Attack, it will also inflict Fear on both enemy Grim and draw a Bond Card.
THE MUMMER MIST is a Ghost Grim with access to Ghost and Light Synergy. It appears that this player did not draw a Ghost nor a Light Element (or did not care to have Synergy), so they’ve instead attached a Spirit to The Nimbus Shade. Remember, you will need three Spirits to trigger a Spirit Bonus, so getting a head start is a good idea.
Now that each player has chosen their starting Grim, they may be flipped to reveal and the match will begin! Be sure you mark each Grim's Health on the Tracker. EVERY GRIM ENTERS PLAY WITH 5 STAMINA.
THE ROUNDS
GRIM is played in Rounds. Grim each have a Speed stat, and they take their Turns in descending Speed order. Each Grim only gets one Turn per Round while active. When the slowest Grim has completed its Turn, the Round is over, at which point Fiend's Favor is passed to the other player. In certain circumstances, for example when a Grim is Paralyzed, Grim's Actions or full Turns will be forced into a "Paralysis Phase." This is effectively a second "Round" within the Round in which those Grim take their Turns from fastest to slowest. In most cases, only one Grim will be affected into the Paralysis Phase (by Paralysis or otherwise).
Let's take a look at a sample placement to analyze Turn order.
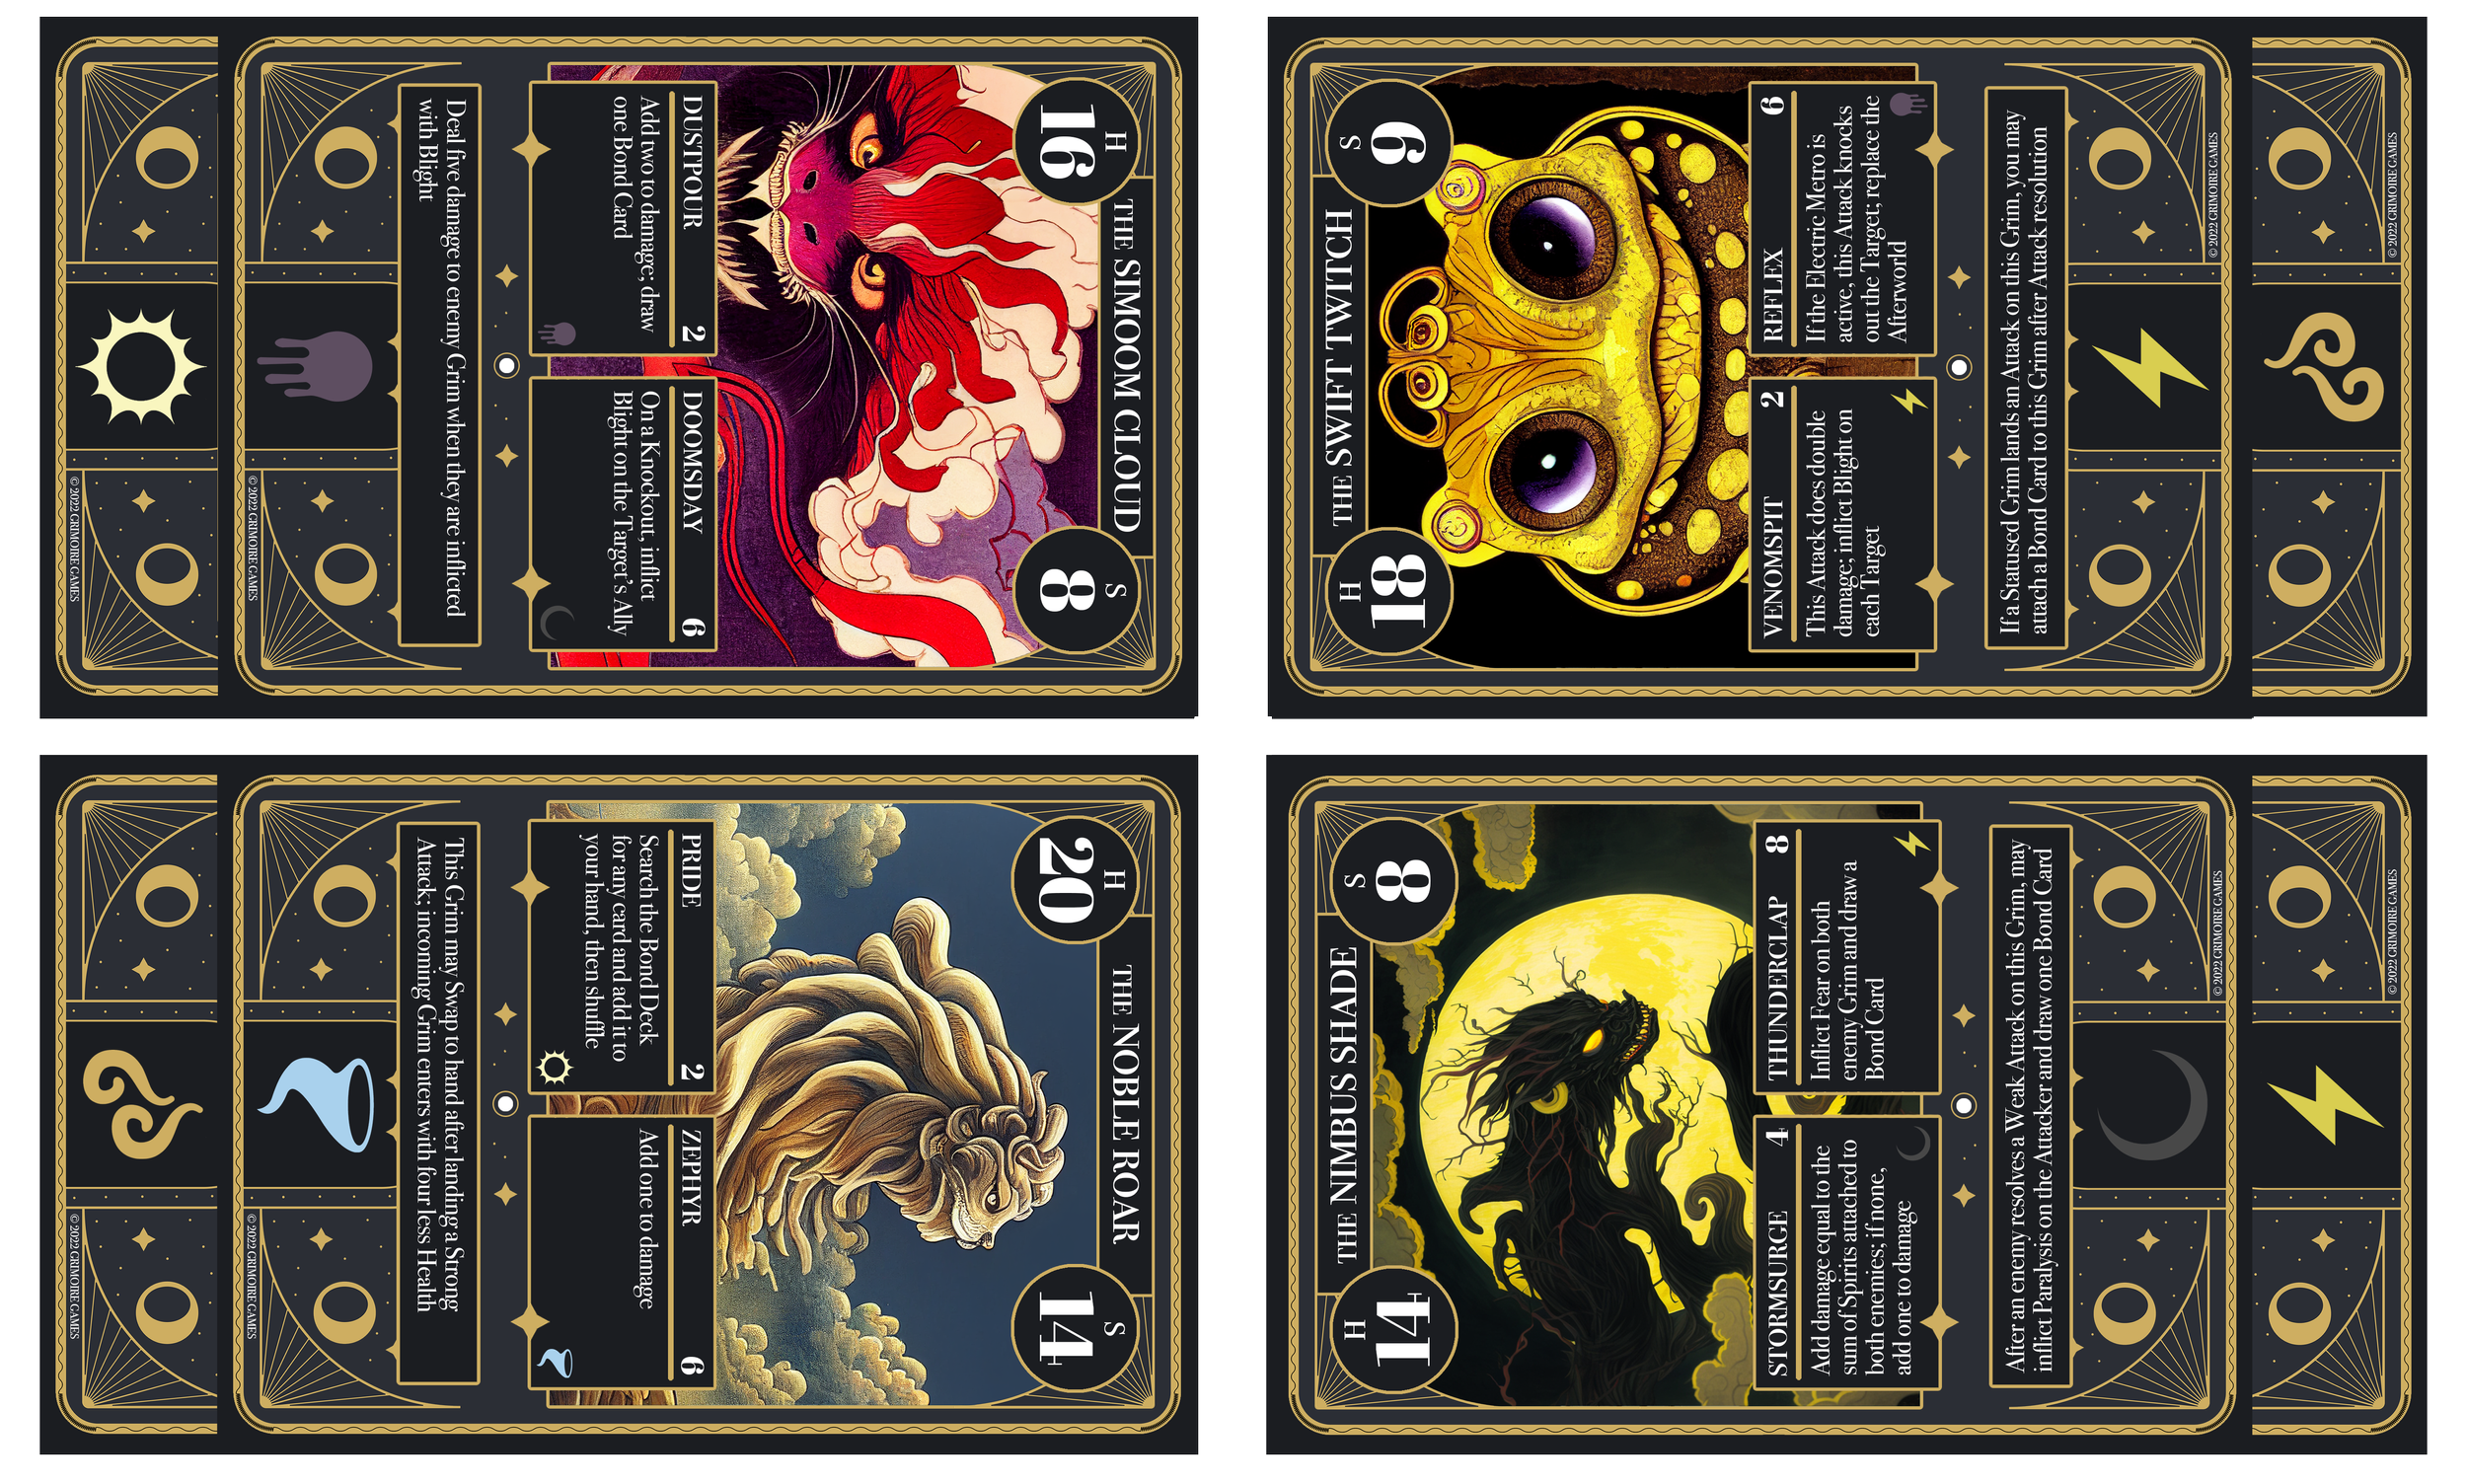
Here, we see that THE NOBLE ROAR is the fastest Grim on the field with 14 Speed, and thus it will take its Turn first.
The next fastest Grim is THE SWIFT TWITCH with 9 Speed, so it will take its Turn second.
And now we come to an impasse: THE NIMBUS SHADE and THE SIMOOM CLOUD both have 8 Speed. Recall that Fiend's Favor breaks Speed ties by effectively adding 0.5 to Speed. So whichever player currently has Fiend's Favor will have their Grim take its Turn first. Let's assume that the player on the right has Fiend's Favor.
This means our Round order is as follows: (1) THE NOBLE ROAR, (2) THE SWIFT TWITCH, (3) THE NIMBUS SHADE, (4) THE SIMOOM CLOUD. Once the final Grim has taken its Turn and any “end of Round” mechanics take place, the Round ends and a new Afterworld will be set into play by the player receiving Fiend’s Favor.
THE TURNS
Each Grim takes a turn in Speed order from highest to lowest. In some instances, like with Paralysis and the Wind Utopia (the Wind Afterworld), some Grim may be forced into a negative Speed bracket at the end of the round called the "Paralysis Phase." In those instances, all "Paralysis Phase" Grim similarly take their Turns in descending Speed order. On a Grim's turn, the following will occur:
START OF TURN: Carry out any start of Turn effects (see, The Purest Insanity).
STAMINA: The Grim gains 2 Stamina.
DRAW PHASE: The player controlling the Grim may draw the top card from (1) the Bond Deck, or (2) either of their Grim Decks.
PLACEMENT PHASE (optional): The player controlling the Grim may place one Bond Card from their hand on either of their Grim. To do this, slide the card under the Grim as shown in the graphic above. If attaching an Element, it may replace a previously attached Element as each Grim can only have one Element attached at a time. If you attach a third Spirit, you must declare a Spirit Bonus immediately.
NOTE: Be sure to look out for Passives that can only occur before a Grim's Action. Carry them out on the Grim's Turn but before moving onto the next step.
ACTION PHASE (optional): The Grim will choose to Attack, Heal, or Swap. You can always forego your action.
IF ATTACKING: The Grim may Attack using either of the two listed Attacks on its card. A Grim cannot declare an Attack on its Ally unless express language forces it to. If an Attack knocks out a Grim, flip its stack and place it in Limbo. Do not play a new Grim until between Turns. Use the following steps to declare and resolve an Attack:
(1) DECLARE: Declare the following:
(A) the Attack,
(B) Elemental damage (which may be the Grim's primary Element or an attached Element),
(C) The Target(s), and
(D) Whether you are triggering a Synergy Effect.
All Attacks must have A-C, Synergy is optional. After declaring, the Attacking Grim must spend 1/2 of the listed base damage in Stamina (e.g., for an 8 damage Attack, spend 4 Stamina). You will not get Synergy unless it is declared.
(2) OPPONENT REACTION (optional): There are two ways to react: (A) inflicting a Status by discarding a Grim from hand; and (B) attaching an Element to the targeted Grim from hand. These will be further discussed in the Reaction section.
(3) ATTACK LANDS OR IS HINDERED: Here, we must determine whether the Attack landed or was Hindered. AN ATTACK WILL LAND AND RESOLVE AS DECLARED UNLESS HINDERED. Hindering occurs in one of three ways related to A-C in the declaration: (A) the Attacker cannot choose the Attack they declared (this only happens with the Freeze Status); (B) the Attacker no longer has the Element they declared for damage; or (C) a Target is no longer on the field. IF AN ATTACK IS NOT HINDERED, IT LANDS, AND ITS DAMAGE WILL RESOLVE GUARANTEED AT STEP 4; SYNERGY STILL NEEDS TO TRIGGER SEPARATELY AT STEP 5.
If the Attack landed, resolve any effects that say “when an Attack lands.” Immediately after, resolve any Attacks that say “after an Attack lands.”
Note an interesting wrinkle to this—if you are targeting both enemy Grim as a result of a Synergy Effect, Earth Haven, or other effect, the loss of that effect will not Hinder your Attack, the Attack will resolve, but you will no longer have the ability to hit both Targets—so you must choose one. For example, if your Grim is holding an Earth Element in the Earth Haven and your Opponent reacts with Root to remove that Earth Element (which allows you to target both enemy Grim), you must resolve that Attack, but only against one Grim.
(4) RESOLVE DAMAGE: Calculate and resolve the Attack damage to the targeted Grim. This will be discussed in greater detail in the next section. Remember the basic rule: an Attack will resolve as declared unless Hindered. If question arise due to situations dealing with Paralysis, Root, Freeze, or Blindness, see the FAQs below.
Resolve any “After Attack resolution” effects here before Synergy triggers.
(5) TRIGGER SYNERGY EFFECT (only if declared): After damage is done, trigger the Synergy Effect. In some instances, all or a portion of the Synergy Effect may impact damage calculation, and so that portion would have already been addressed. Any other effect should be carried out at this step. SYNERGY ONLY TRIGGERS ONCE EVEN WHEN TARGETING TWO GRIM. If you declared Synergy at the declaration step, it will trigger here regardless of what happened in the interim. The only ways that Synergy can be negated are Blindness (as discussed below) and your Grim being knocked out before this step (see, Confusion).
IF HEALING: A Grim may Heal as an Action. Grim Heal by spending any combination of Stamina and/or attached Bond Cards (any Spirits and Elements attached to that Grim).
IF SWAPPING: Swapping may be thought of as Healing+ and CAN ONLY BE USED BY A GRIM THAT IS BELOW ITS BASE HEALTH. If the Grim can Heal back to or above its base Health, it can do so to Swap as its Action. To Swap, Heal to or above full Health, then Swap (trade places) with a Grim in your hand. Any unspent attached Bond Cards will attach to the newly placed Grim. You do not get to attach a Bond Card to this newly placed Grim like you would in the case of a Knockout. This new Grim may get a Turn within the Round that it’s placed if it’s slower than the current active Speed tier.
AFTER ACTION: In limited circumstances, a Grim Card may have "after Action" mechanics in its Passive. Carry these out at this step and end the Turn.
REPLACE KNOCKED OUT GRIM: If any Grim was knocked out in the Turn, the player controlling it must pick up a Banished. Replace that knocked out Grim at this step. Because the new Grim isn't placed until the previous Grim's Turn has concluded, in certain circumstances, a Synergy Effect will trigger with only one or no Grim on the other side. Simply carry out effects if they can be carried out.
REPLACE DEPLETED DECKS: If the Bond Deck was fully depleted, turn Limbo into the new Bond Deck after shuffling. If the Afterworlds were fully depleted and it's the end of the Round, revive all Afterworlds.
THE ELEMENTS & ATTACK RESOLUTION
Now that you understand the game flow, let’s discuss aspects of the game that will impact calculations and strategy starting with the Elements. This game has a linear Elemental interaction system, meaning each Element is strong against one Element and weak to another. The graphic below displays each Element. Each is strong against the Element to its right and weak against the Element to its left (Poison wraps around to be strong against Water). An Element also resists itself. In order below, these Elements are Water, Fire, Plant, Earth, Electric, Wind, Light, Dark, Ghost, Psychic, and Poison.

To illustrate how the Elements interact, let's consider Fire damage. If a Grim is Attacking using Fire damage, the damaged Grim's Element will determine whether there is any interaction that may increase damage, decrease damage, or nullify damage entirely.
ATTACKING PLANT. If Fire damage hits a Plant Grim, that is a STRONG ATTACK because Plant is weak to Fire. A Strong Attack adds two damage.
ATTACKING FIRE. If Fire damage hits a Fire Grim, that is a WEAK ATTACK because Fire resists itself (as does every Element). A Weak Attack subtracts two damage.
ATTACKING WATER. If Fire damage is aimed at a Water Grim, no damage results because Water Grim are IMMUNE to Fire damage. Effectively, we think of this as missing the Attack entirely, meaning any mechanics that might rely on landing that Attack will not trigger.
Attacking any other type would result in neutral damage, meaning no modifiers. Recall, however, that you can attach an Element to a Grim, meaning in some cases you must calculate an Attack based on two defending Elements. Resolve against each Element to calculate damage (e.g., Fire damage against a Plant/Fire Grim would offset, with Fire doing +2 to the Plant aspect and -2 to the Fire aspect). The existence of any Immunity always trumps all other interactions (e.g., Fire damage against a Water/Plant Grim would result in no damage). Note that sometimes you can ignore these interactions. For example, you will encounter text in the game that says, "All Attacks by Fire Grim using any Element are Strong Attacks." In these cases, the Elemental interactions are irrelevant, as a Strong Attack is guaranteed. When resolving damage, ADD AND SUBTRACT BEFORE MULTIPLYING AND DIVIDING (except in the case of Blight, the Poison Status). In addition to Elements, consider whether Synergy, the Afterworld, Passives, or Status impact damage.
When resolving Attacks, remember these rules:
Attacks will always be resolved as declared unless they are Hindered (made impossible) in one of three ways: (1) they no longer have the Element they declared for damage; (2) the Target is no longer on the field; or (3) they cannot choose the Attack they declared. Hindering can be caused by a Status, and in all cases other than Paralysis you’ll regain your Stamina and redeclare your Action. In the case of Paralysis, you must redeclare an Attack.
Consider a situation in which your Earth Grim declares an Attack against each enemy Grim in the Earth Haven, then it’s Paralyzed, and then the Earth Haven is replaced before its Attack resolves. The fact that the Earth Haven is gone does not impact its Attack because it was already declared and it has not been Hindered.
Synergy will always trigger if you declared it, unless your Grim is inflicted with Blindness (which negates the Synergy) or your Grim is knocked out before the Synergy triggers (Confusion may cause this).
Similar to the example above, consider that your Grim declares an Attack with Synergy, then it’s Paralyzed, and then its Ally loses the Element supporting that Synergy before its Attack resolves. The fact that the Element is gone does not impact its Synergy because it was already declared.
Note that there are two types of damage in this game: (1) damage done by Attacks, and (2) all other damage. The latter comes from Afterworlds, Passives, and Synergy Effects usually in the form of “Deal X damage to Y.” This kind of damage is incidental and cannot be separately reacted to.
THE REACTION
Each player has one Reaction per Round. Reactions are used by Grim when they are the Target of an Attack. (1) Status Reactions can be used by revealing and discarding a Grim from hand to inflict its primary Element’s Status (for example, discard a Fire Grim to inflict Burn on the Attacker); (2) Element Reactions can be used by attaching an Element to the Target Grim. This Element may impact damage calculations, but does not need to. YOU CANNOT PLACE A SPIRIT CARD AS A REACTION. Once your Reaction is used, remove the cube from the “R” on your Tracker. When the Round ends, you may replace the cube.

ATTACHING AN ELEMENT. We have discussed how different Elements may interact to cause Strong Attacks, Weak Attacks, and Immunities. As a Reaction, you may choose to play an Element on the targeted Grim to impact the damage dealt. Imagine that THE NIMBUS SHADE targeted THE SIMOOM CLOUD with Electric damage in the illustration here. As a Reaction, the player controlling THE SIMOOM CLOUD may attach an Earth Element (if one is in their hand) as shown here to become Immune to the oncoming damage. THE NIMBUS SHADE WILL STILL SPEND THE STAMINA FOR THE ATTACK DESPITE THE RESULTING ZERO DAMAGE.
INFLICTING A STATUS. The other way to use a Reaction is to inflict a Status. To inflict a Status, simply show and discard a GRIM CARD (NOT AN ELEMENT) from your hand, and that Grim's Element's Status will be inflicted on the Attacker (Statuses are discussed in the next section). For example, When THE NIMBUS SHADE Attacks THE SIMOOM CLOUD, the player controlling THE SIMOOM CLOUD can reveal and discard a Poison Grim to cause Blight on THE NIMBUS SHADE. Note that some Statuses, like Blight, do not impact the currently declared Attack. Contrast this to another example: reacting to discard a Fire Grim will inflict Burn. Because Burn halves the next or current declared Attack, the Attack damage currently being resolved would be cut in half (after which Burn would dissipate naturally).
Grim can only have one Status at a time. If a Grim that is currently Statused is inflicted with another Status, it will replace the existing Status. A GRIM CAN NEVER BE INFLICTED WITH ITS OWN ELEMENT'S STATUS ON A REACTION, BUT CAN BE WHEN STATUS IS APPLIED AS A RESULT OF A SYNERGY EFFECT, PASSIVE, OR OTHER NON-REACTION MECHANIC (e.g., you cannot Burn a Fire Grim using a Reaction, but if your Synergy Effect causes Burn, you can inflict a Fire Grim with it). A Status can be replaced with itself.
Some mechanics have trigger effects that happen “after Reaction.” Note that this language simply requires that the trigger come after a Reaction would take place, not that a Reaction has actually occurred. Even if you do not choose to use a Reaction, “after Reaction” effects will trigger.
THE STATUS & SPIRIT BONUS
There is one Status and Spirit Bonus for each Element. For now, don't focus on memorizing or fully understanding these mechanics, as they are summarized on your PLAYER GUIDE, but reference the below if questions arise.
STATUS. Grim can be inflicted with a Status effect to cause it some mechanical detriment. There is one Status related to each Element. Some Grim can cause Status with Synergy Effects (the special effects on Attacks), but the main source of Status infliction is REACTIONS. We will discuss how to use Reactions in a later section. A GRIM CAN ONLY HAVE ONE STATUS AT A TIME, and a new Status will replace an existing Status. STATUS WILL BE AUTOMATICALLY CURED BY ANY AMOUNT OF HEALING. The following are summarized on the PLAYER GUIDE.
-
A Frozen Grim cannot choose its higher base damage Attack on its next Turn’s Action or otherwise when it Attacks next. If inflicted as a Reaction in response to its higher base damage Attack, the Attack is Hindered. The Frozen Grim will regain its Stamina and redeclare its Action. Freeze clears after the Frozen Grim completes a Turn or otherwise Attacks.
-
The Attack damage from a Burned Grim’s next Attack is halved. If inflicted as a Reaction, the currently declared Attack’s damage is halved. Burn clears after the affected Attack resolves, even if the Target is Immune.
-
A Rooted Grim’s Bond Cards immediately bounce back to its player’s hand. If no Bond Cards are attached when Rooted, the next attached will bounce to hand. If inflicted as a Reaction to an Attack declaring Elemental damage based on an Element that has been bounced to hand, the Attack is Hindered. The Rooted Grim will regain its Stamina and redeclare its Action. Root clears as soon as a Bond Card is bounced to hand.
-
After a Grappled Grim resolves its next Attack, but before Synergy triggers, one half of the calculated Attack damage will be dealt to the Grappled Grim’s Ally. If inflicted as a Reaction, this effect applies to the currently declared Attack. Grapple clears after the affected Attack is resolved, even if the Target is Immune.
-
Paralysis works differently when inflicted as a Reaction and when not. When not inflicted as a Reaction, the Paralyzed Grim’s next Turn will occur in the Paralysis Phase. The affected Grim should not spend its Stamina until the Attack lands in the Paralysis Phase. If inflicted as a Reaction, the currently declared Attack is paused and resolves in the Paralysis Phase. If Paralysis is Cured or replaced with another Status, the Attack will resolve immediately. If the Attack is Hindered (Target is no longer present or Element used for damage is no longer present), the Paralyzed Grim will redeclare the same Attack. Paralysis clears after the affected Turn or Attack resolves.
NOTE: The Reaction and non-Reaction effects are separated intentionally. If you encounter the rare situation in which your Grim is Paralyzed as a Reaction when declaring an Attack that is not its Turn’s Action, only that Attack will be delayed to the Paralysis Phase, and that Grim will still carry out its Turn in normal course.
Also note that in some instances, a Grim’s Paralysis Phase Turn (or resolution step) will never come (see, Lunar Wing or Theseus Bud Passives). If your Grim is Paralyzed as a Reaction, your suspended Attack will always resolve by the end of the Round, so if your place is skipped before the Round ends, resolve the Attack and clear the Paralysis at the end of the Round. If multiple effects happen at the end of the Round, remember to carry them out in Speed order. -
A Thrown Grim cannot choose to Attack as its Action on its next Turn. This effect does not prohibit Attacks gained in other ways. Throw clears after the Thrown Grim’s next Turn.
-
A Blinded Grim’s next declared Synergy Effect is negated. If inflicted as a Reaction to an Attack that has been declared with Synergy, that Attack’s Synergy Effect is negated. Blindness clears after a Synergy Effect is negated.
-
A Feared Grim’s next Attack is a Weak Attack unless the Target is Immune or an Afterworld, Passive, or Synergy Effect makes it a Strong Attack. If inflicted as a Reaction, this effect applies to the currently declared Attack. Fear clears after the affected Attack resolves, even if the Attack does not result in a Weak Attack.
-
The next time an Attack (that is not Hindered) resolves against a Cursed Grim, it is a Strong Attack unless the Attacker is Feared. Curse clears after the next Attack is resolved against the Cursed Grim. Note that the Poison Rapture can trump Curse, as does Fear.
-
After a Confused Grim resolves its next Attack, but before Synergy triggers, one half of the calculated Attack damage will be dealt to the Confused Grim. If inflicted as a Reaction, this effect applies to the currently declared Attack. Confusion clears after the affected Attack is resolved, even if the Target is Immune.
-
The next time an Attack (that is not Hindered) resolves against a Blighted Grim, it does double base damage (the damage listed on the Attack) before all modifiers. Blight clears after the next Attack is resolved against the Blighted Grim, even if the Blighted Grim is Immune to that Attack.
-
This Grim and its Ally collectively gain eight Stamina which can be divided in any way between them
-
This Grim’s next non-Hindered declared Attack does six additional damage and enemy Grim cannot be Immune to it
-
Instantly Heal eight Health and Cure Status on this Grim
-
This Grim’s next non-Hindered declared Attack targets both enemy Grim using the same Element (each a declared Attack)
-
This Grim may declare an Attack immediately; this does not replace its Turn’s Action; must pay required Stamina for the Attack
-
Swap this Grim with a Grim in your hand and add its current Health or Stamina to the incoming Grim
SPIRIT BONUSES. As noted above, Spirits can be attached to Grim, and attaching three Spirits will unlock a Spirit Bonus. THE MOMENT YOU ATTACH YOUR THIRD SPIRIT TO A GRIM, YOU MUST DISCARD THE SPIRITS AND DECLARE A SPIRIT BONUS RELATED TO ONE OF THAT GRIM'S ELEMENTS. If a Grim Swaps out before using the benefit of its chosen Spirit Bonus, it will not retain the benefit. Otherwise, a Spirit Bonus benefit will persist until it's used, which is generally very quickly, sometimes instantaneous. One exception to this general rule is the Light Spirit Bonus—when attaching a third Spirits and choosing the Light Spirit Bonus, the player will keep those Spirits attached. Any removal of a Spirit to bring that player below three or the removal of the Light Element (or, for example, if the Light Grim Swaps out such that the Light Element is no longer active), will require the player to trigger a new Spirit Bonus and force discard of three Spirits as normal. Recall as well that Bonds “attach” to a new Grim when the Grim that had them Swap. Also recall that Spirit Bonuses are owned by the Grim that triggered it. So if a Grim with a Light Spirit Bonus Swaps into a new Grim that also has a Light Element, that new Grim may choose to keep the Light Spirit Bonus or choose a new one (based on its other Element).
-
Keep Spirits attached; no Reaction to this Grim’s Attacks; when Light is no longer on this Grim, choose new Spirit Bonus, discard Spirits
NOTE: The necessary condition for a Spirit Bonus is having three Spirits. This means that if you lose a Spirit such that you no longer have three, you no longer have a Light Spirit Bonus. Also, Grim do not share Spirit Bonuses between Swaps. So if the Grim with a Light Spirit Bonus Swaps to a new one, that new Grim must choose a Spirit Bonus. If the Light Element is still active, it may choose the Light Spirit Bonus just the same, but it is not required to. If the Light Element is no longer active, it must choose another (and discard the Spirits). -
Next Knockout by this Grim this Round counts as two if using an Attack or its Passive (not via Afterworld effect or self or Ally damage)
-
Deal damage to both enemy Grim equal to the number of cards in your Opponent’s hand
-
Move any attached Elements to different Grim (none to Limbo) and/or replace the Afterworld, even with a discarded Afterworld
-
Inflict both enemy Grim with their primary Element’s related Status
THE KNOCKOUTS & WINNING
Near the start of this Rulebook, we discussed the BANISHED, which are the four cards that each player drew from the Grim Decks that their Opponent banned (two from each banned Grim Deck). When one of your Grim is knocked out, it and all of its attached Bond Cards are discarded to Limbo. You then pick up your top Banished card (recall that you should have never viewed these cards unless a mechanic expressly dictates that you reveal a Banished).
Because the Banished Grim are pulled from the Grim Decks that your Opponent banned, it is likely that they will be useful against your Opponent. For example, a player who chooses the Fire Deck may choose to ban the Water Deck, because Fire is weak to Water. However, strategy may dictate that you avoid banning decks that you are weak to, because the Banished mechanic will guarantee that your Opponent has access to two random cards from that deck. Whatever strategic choices play into how the Banished are chosen, it is certain that they are a comeback mechanic for the player that has just lost a Grim. Once you force your opponent to pick up all of their Banished cards and you secure one more knockout, you win the match.

THE KEY TERMS
-
In a Grim’s turn, its last step. Actions to be chosen from are Attack, Heal, and Swap. An Action must be declared, then carried out in a specific order of operations set forth in the rules above.
-
An Action that a Grim may choose on its Turn. Each Grim Card has two Attack boxes shown on the card, one of lower and one of higher base damage. Either can be used so long as the Grim as sufficient Stamina to use it (1/2 of base damage listed on the card). Targeted Grim may use Reactions to Attacks.
-
A terrain effect card that rotates each Round, chosen by the player that has Fiend’s Favor. Each Afterworld benefits one Element and detriments the Element that it’s weak to (e.g., the Fire Empire benefits Fire Grim and detriments Water Grim). At the end of a Round, or when an Afterworld is replaced, the Afterworld is discarded to a special Afterworld discard pile. Afterworlds can be revived to the Afterworld Deck via certain express mechanics.
-
The Banished are cards derived from a player’s opponent’s banned decks from the Pick-Ban Phase. Players must draw one Banished when one of their Grim is knocked out. When a player has no more Banished to pull from and they suffer a Knockout, they lose the game.
-
Elements and Spirits which combined make up the Bond Deck. Players draw from the Bond Deck throughout the match.
-
The term used to describe the intentional dissipation of a Status. Curing is the natural result of any Healing. Curing may also occur due to Synergy Effect, Passive, or other mechanic.
-
There are 11 Elements. Each has its own mechanical leanings (e.g., Healing, Stamina gain, draw power, extra Attacks, etc.). The Element shown at the bottom of each Grim Card is its “primary Element” and can be used to launch either Attack shown on the Grim Card. Attached Elements (Bond Cards) can also be used to launch the same Attacks. Grim can only have one Element Card attached at a time unless a mechanic expressly says otherwise.
-
The designation that a player has each Round that provides: (1) 0.5 additional Speed; (2) the ability to choose the Afterworld for the Round; and (3) the ability to search for a Grim from their Grim Decks before the Round begins.
-
A creature used in battle, 4 of which are active at a time. Grim Decks are made up of 10 Grim and each relate to a specific Element. Grim can also be discarded from your hand when one of your active Grim is targeted with in Attack to cause its Element’s Status. Each Grim has a Health, Speed, two Attacks, and a Passive. All Grim enter play with 5 Stamina by default.
-
An Action that a Grim may choose on its Turn or a free effect from Synergy that results in gaining Health. The Grim may expend any amount of available Stamina and attached Bond Cards to Heal 1-to-1. Any Healing Cures all Status. You cannot choose this Action if you are unable to Heal (e.g., at 20 Health). The process of gaining Health is what clears Status--you cannot Heal for 0 Health (even by Synergy) to Cure Status.
-
A value displayed on the Tracker for each Grim. Health is shown on each Grim Card in the top left. When a Grim’s Health reaches zero, it is knocked out and discarded to Limbo with all attached Bond Cards.
-
Attacks can be Hindered by several methods, but all result in one of three outcomes: (1) the Grim that the Attack is targeting is no longer on the field; (2) the Attack itself can no longer be used (for example, as a result of Freeze); or (3) the Element that the Attacking Grim is using to Attack is no longer available to that Grim. In any case of Hindering, the Grim that declared the Attack regains its Stamina and re-declares. Usually the Grim will re-declare any Action, however Paralysis requires re-declaration of an Attack. Reactions that cause Immunity do not Hinder.
-
The condition by which a Grim does not take damage from an oncoming Attack because of some effect, usually as a result of an Element Reaction (e.g., oncoming Fire damage Attack, targeted Grim reacts by attaching a Water Element). When a Grim is Immune to an Attack, no damage is done and no Synergy Effect triggers. The Attacking Grim does not regain Stamina.
-
The result of a Grim’s Health reaching zero and it being sent to the Limbo with all attached Bond Cards. When a Grim is knocked out, its player must draw one card from their Banished Pile. If they have no Banished remaining when they suffer a Knockout, they lose the match.
-
The Paralysis Phase occurs at the end of a Round and only applies in certain circumstances (e.g., Grim are Paralyzed or the Wind Utopia forces Electric Grim Turns to the Paralysis Phase). Within the Paralysis Phase, Grim that are forced into it (like Paralyzed Grim) take their turns in highest to lowest Speed order. This can be thought of like a negative priority Speed bracket; all Grim unaffected by conditions that would force them into the Paralysis Phase will take their turns first, then all remaining Grim do the same in the Paralysis Phase.
-
A continuously active effect listed at the bottom of every Grim Card that may trigger when conditional language is fulfilled.
-
The pre-game process by which players choose and ban Grim Decks more fully described in the rules above.
-
The card provided to players that displays Status effects on one side and Spirit Bonuses on the other.
-
The optional step that an opponent may take when targeted with an Attack. Targeted Grim may use a Reaction in one of two ways: (1) by placing an Element on itself (which may, but does not need to, impact damage calculation); or (2) by revealing and discarding a Grim to cause its primary Element’s related Status.
-
This term is used in mechanics that allow you to “Replace” the Afterworld. In these situations, you are expected to place the active Afterworld into the discard pile and put a new Afterworld into play. You may only choose from the available non-discarded Afterworlds unless text states otherwise.
-
This term is used when you “Revive” an Afterworld from discard. In these situations, you do not change the active Afterworld. You simply take a discarded Afterworld and add it to the deck of available non-discarded Afterworlds.
-
Under normal conditions, a Round consists of all Grim taking their turns from fastest to slowest. Once the slowest Grim has completed its turn, the Round ends. In certain circumstances, for example when Grim are Paralyzed or the Wind Utopia and Electric Grim are active, there is an additional Paralysis Phase in the Round.
-
A value shown on each Grim Card in the top right. Active Grim take Turns from highest to lowest according to their displayed Speed. Fiend’s Favor grants 0.5 to Speed. Thus, with 10 unique speeds and “high” and “low” rungs within each Speed due to Fiend’s Favor, there are effectively 20 unique Speed tiers. There are technically additional Speeds to check when Grim are forced into the Paralysis Phase.
-
A Bond Card that may be attached to a Grim. Attaching 3 Spirit Cards to a Grim will immediately trigger a Spirit Bonus.
-
An instant benefit that is triggered by attaching three Spirit Cards to a single Grim. There is a Spirit Bonus related to each Element, and the Grim that triggers a Spirit Bonus may choose the Spirit Bonus related to its primary Element or its attached Element, as applicable. The Spirit Bonuses are displayed on the Player Guide.
-
A resource displayed on the Tracker for each Grim. All Grim enter play with 5 Stamina by default. Each Grim gains 2 Stamina at the beginning of its Turn. Grim may expend Stamina to do Actions. Refer to Attack, Heal, and Swap for more information.
-
A condition that is inflicted by some mechanic that relates to a specific Element. Each Element has a related Status (e.g., Burn for Fire, Freeze for Water), and their effects are detailed on the Player Guide. Statuses naturally dissipate upon triggering the conditional language included in their descriptions, or when Cured by Healing or another mechanic.
-
An Action that a Grim may choose on its Turn. If the Grim is not at or above full Health, and it can expend a combination of attached Bond Cards and Stamina to Heal to full Health, it may switch places (Swap) with a Grim in the player’s hand. Any unspent attached Bond Cards will attach to the newly placed Grim. The newly placed Grim will not get a turn within the round unless it is slower than the Grim that most recently began its Turn.
-
The Grim being targeted with an Attack.
-
Each Grim takes a Turn within each Round in Speed order. Turns are an ordered process of: (1) gaining 2 Stamina; (2) drawing a Bond Card or Grim Card; (3) placing a Bond Card; (4) declaring an Action (Attack, Swap, Heal); and (5) resolving any other mechanics before or after that Action.
-
How are numbers rounded in GRIM?
Always round up. The only minor exception is Fiend's Favor, which we sometimes colloquially say adds 0.5 Speed to your Grim. When using Speed values to calculate something, it does not round up.
How is Attack damage calculated when you're hitting two Targets?
Each Attack is dealt with separately (each a declared Attack), so there are two "calculated Attack damages" involved. If the Opponent inflicts Grapple as a Reaction to a spread Attack like this, they must declare which Target Grim is using the Reaction, so it only applies to one of those damage calcs.
When hitting two Targets, does Synergy proc twice?
No, Synergy Effects always proc once, and there is often reminder text on Synergy Effects that state this. Note that some Synergies apply to "each Target," which will impact the Target(s) of the Attack, and other apply to "both enemy Grim" or "an enemy Grim," which do not care about the Target of the Attack.
What does "calculated Attack damage" refer to?
This refers to the damage done by a single Attack. GRIM has two forms of damage: (1) Attack damage (often called calculated Attack damage); and (2) Deal damage (often prompted with "deal X damage" to a Grim). Calculated Attack damage is the full calculation of a single Attack, which may include modifiers from the Afterworld, Passives, Synergy, and Elements.
If you’re Hindered, does regaining Stamina count as a Stamina gain for the purpose of Water World? What about when you steal Stamina?Stamina “regains” do not apply, but stealing does. The regain function is a way of reflecting that you never spent the Stamina in the first place.
-
When a mechanic allows me to draw a card and trigger an effect based on it, do I have to reveal it?
Yes, but only if that effect triggers. For example, if the Sweet Wraith draws from the top of Limbo and it is not a Spirit, meaning it will not get to deal 3 damage based on that draw, you do not need to reveal it. But to trigger the effect, you must reveal it.
What decks are public information?
Anything face-up is public information, anything face-down is not. This means Limbo, the discard, is not public information. Afterworlds (including this discard) are public information.
-
When does a Status go away (clear)?
Status will naturally clear when (1) its condition resolves (see the gold text on your Player Guide), or (2) the Statused Grim Heals.
Can a Grim be inflicted with more than one Status? Can a Status replace itself?
No, a new Status will always replace an old Status. Yes, a Status can replace itself. This can lead the following situation: assume your Grim declared an Attack and was Paralyzed. That Attack as declared is suspended until the Paralysis Phase. Now imagine that another mechanic Paralyzes that Grim again. The first Paralysis will clear, thus launching the Attack early. After, that Grim will be Paralyzed for the next Round.
Can Grapple remove Synergy?
No. It's common it think this because Grapple damage triggers before Synergy procs. However, the default rule is that an Attack will trigger as declared (including with Synergy as declared) unless Hindered. This means that if you declared an Attack with Synergy, it will always resolve with Synergy regardless of what happens in the interim (with the sole exceptions being Blindness, which would negate that declared Synergy, and your Grim being knocked out, because no effect trigger from Limbo).
What happens if I have Synergy on my Attack, but my Grim is knocked out to Confusion before Synergy procs?
No effects will trigger from Limbo, so in this case Synergy will not proc. Consider a similar case where a Grim declares an Attack and in knocked out from a Status Reaction in the Poison Rapture (taking 3 damage when inflicted when a Status). In this case, it also seems reasonable that the Attack would not continue from Limbo.
Can Blindness Hinder an Attack?
No, because losing Synergy doesn’t Hinder an Attack. Hindering only happens when (1) your target is no longer on the field; (2) your Element for damage is no longer usable/present; or (3) your selected Attack cannot be declared. This question may come up if you declared an Attack with Synergy that allows you to target both enemy Grim. If so, notice that none of the Hinder requirements are applicable (the Targets are still on the field). Therefore, the Attack will resolve as declared while the Blindness removes your Synergy as part of that declaration, forcing you to choose one Target.
If my Earth Grim declares an Attack in the Earth Haven against both enemy Grim, then my Grim is Paralyzed as a Reaction, and the Earth Haven is replaced before the Paralysis Phase, do I still hit both Targets?
This is a great question that pulls together several FAQs. The answer is yes, you still hit both Targets as long as they're both on the field still, and here's the logic: (1) Attacks will resolve as declared unless Hindered. Hindering is (A) losing your Element supporting damage; (B) no longer being able to choose the selected Attack; or (C) a Target no longer being on the field by the time your Attack resolves. Here, assuming you still have your Element, you haven't been Frozen, and your Targets are both still on the field, your Attack has not been Hindered, so it resolves as declared. Importantly, note that Paralysis does not stop your Attack and force you to redeclare in the Paralysis Phase--it suspends the declaration and resolves it as declared (i.e., you are not re-declaring). Because the Earth Haven was there at the declaration step, you will hit both Targets. This can be analogized to a common question of "can you lose Synergy?" The answer to that is no, unless you are Blinded. If Synergy is there when declared, it resolves with it, just like this example.
-
Do I have to attach Bonds in a specific order?
Yes, chronologically. Ghost mechanics will sometime rely on having certain cards at the top of Limbo, so the way you attach them is important. When discarding, simply flip your whole stack, collapse it, and place it in Limbo (your Grim should be on the bottom and your last attached card on top).
Can you have more than one Light Spirit Bonus?
Yes, you can have as many as you please. Note that when the Light Element goes away, you will need to choose new Spirit Bonuses, and they may end up being duplicative, thus making one irrelevant (e.g., two Dark Spirit Bonuses).
How does the Light Spirit Bonus work?
The Light Spirit Bonus allows you to maintain your attached Spirits to prevent all Reactions to that Grim's Attacks. Note that the necessary condition for a Spirit Bonus is 3 Spirits, so falling below that number will remove the Light Spirit Bonus. Also note that losing the Light Elements will invalidate the Spirit Bonus, forcing you to trigger a new Spirit Bonus based on your current Element makeup (and discard the Spirits given that you would be choosing a new non-Light Spirit Bonus). Finally, note that Grim do not pass Spirit Bonuses on when they Swap, and that is also true of the Light Spirit Bonus. However, if your Grim has an active Light Spirit Bonus and it Swaps into another Grim, that new Grim newly attaches all of those Spirits and may newly choose a Spirit Bonus. Assuming the Light Element is still in play, it can be that, but it can also be another bonus.
What does it mean to move Elements in the Psychic Spirit Bonus?
This simple means to take Elements from Grim and place them on different Grim. It does not allow you to force any to Limbo or to a player's hand.
-
What is the priority when multiple Grim have effects at the same time (e.g., End of Round, Beginning of Round)?
In these cases, effects are triggered in Speed order from high to low just as is the case with Turn order.
What does "before this Grim's Action" mean in a Passive?
This means you can trigger this effect at any time before the Grim's Action within its Turn. The Turn begins when you gain Stamina.
How does Paralysis interact with the Wind Utopia?
Paralyzed Grim move to the Paralysis Phase; Electric Grim move to the Paralysis Phase in the Wind Utopia. These are synonymous effects that do not stack in any way. They simply both achieve the same result.
In what order do I resolve an Attack against both enemy Grim?
Generally speaking, the Attack chooses which comes first in time, so to speak (they are effectively simultaneous). An exception to this is when the Opponent is reacting to inflict a Status--that player will choose which of their Grim is inflicting the Status, effectively determining which comes first in time.
-
When do I place a new Grim after a Knockout?
Between Turns. The current Turn must fully resolve (or be forced to resolve in the Paralysis Phase) before placing a new Grim.
What does "on a Knockout" mean in a Synergy Effect?
This means that the Synergy Effect has an additional condition of you securing a Knockout with the Attack for the effect to proc.
What happens if I Swap when my Grim has a Spirit Bonus triggered?
The basic rule is that Spirit Bonuses are not shared between Grim. This means a Swap will result in the loss of that Spirit Bonus. The only nuance to this is that the Light Spirit Bonus may be newly re-chosen when Swapping if the Light Element is still active, as the Spirits are still present sufficient to support a Spirit Bonus.
What happens if I don't have a Grim to play?
This is exceptionally rare due to the Banished system, and only happens when you draw a Banished and then use it as a Reaction before the end of a Grim's Turn. If this ever happens, topdeck either of your Grim decks for a new Grim to place.
What happens when Grim on both sides take simultaneous damage?
This is very rate, but consider a case where one Grim's Passive damage all other Grim instantly. In this case, the damage will hit the Opponent of that Grim first.
THE FAQs
HOW TO PLAY GRIM: COVEN
GRIM: Coven is an alternate game format for GRIM in which players build teams of their favorite Grim in advance of battle. These are shorter matches that test players’ ability to design intricate strategies with very few Grim. The format is heavily based on the standard format detailed above, so this section will only address alternate game rules.
Each player must bring 8 unique Grim (called a “Coven”) and one Grimlord card to the table (this can be played with one box of GRIM, but two boxes will allow for individual Grim to be on both teams). In order the following will occur:
Both players place their Grimlords face up below their Trackers.
Next, players will be given the opportunity to Banished two Grim from their opponent’s Coven to the Banished Pile. One player can set aside two Grim face-down that cannot be Banished; the other player will have Fiend’s Favor in the first Round and can set aside only one Grim face-down. Players can decide mutually or flip a coin to determine this. Both players will then reveal their protected cards, keep them set aside, and trade their remaining Grim with their opponent for review. Each player Banished two Grim from their opponent’s Coven, place those in their opponent’s Banished Pile, and pass the Coven back. At this point, each player should have 6 Grim in their hands and 2 Banished Grim.
Each player will draw 4 Bond Cards.
The player with Fiend’s Favor will set the Afterworld into play.
Players place their Grim as normal, and the match can begin.
As you may have noticed, this format has 2 Banished instead of the standard 4—this leads to much faster-paced matches. As with standard GRIM, you lose when one of your Grim is knocked out and you have no Banished to draw remaining. The match will otherwise be played out as normal with a few exceptions:
The Grimlord card in front of you grants its Element’s Synergy to all Attacks that require it. For example, if you bring a Water Grimlord to battle, all Attack that require Water Synergy will have it.
When you use a Reaction to inflict a Status, you will reveal the Grim from your hand but you won’t discard it—simply return it to your hand and proceed.
When you trigger a Spirit Bonus, you always have the option of consuming your Reaction token to use your Grimlord’s Spirit Bonus. For example, if I bring the Water Grimlord to battle and my Fire Grim triggers a Spirit Bonus, I can remove my Reaction token to use the Water Spirit Bonus.
There are no Grim Decks in this format, so any Synergy that allows you to search your Grim Decks is ineffective.
As normal, a player loses when they have no Banished left to draw after they suffer a Knockout. Join the Discord to show off your favorite Covens!